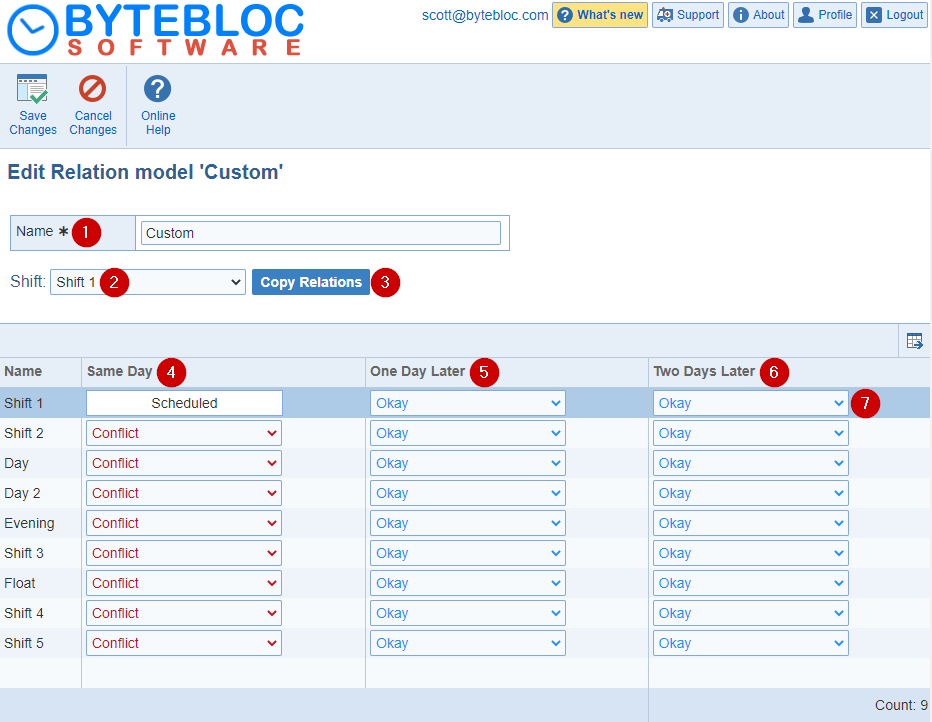
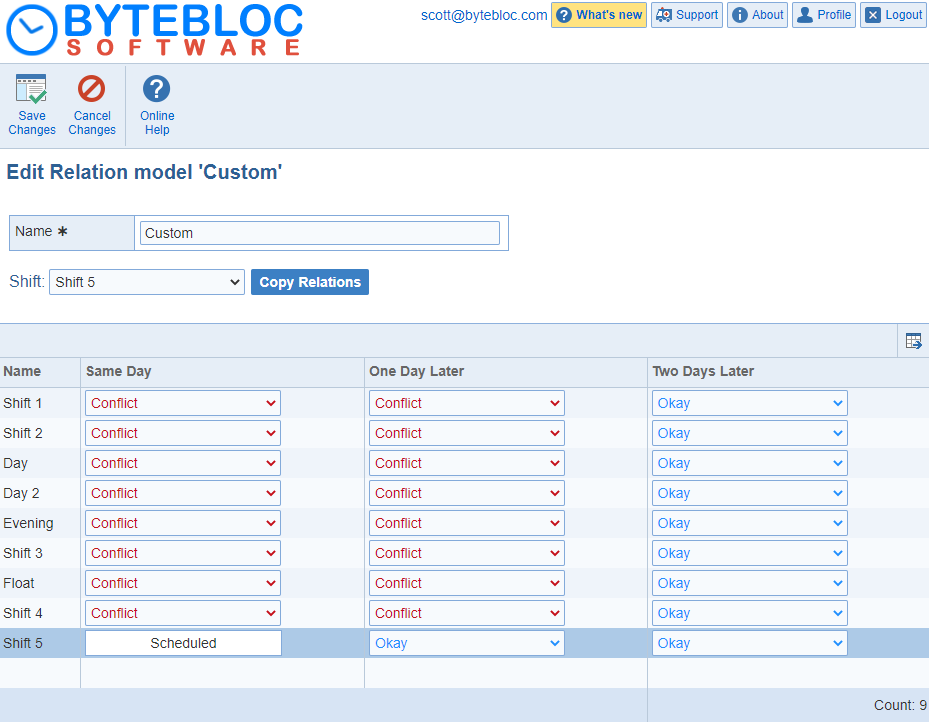
The relationships between one Scheduled shift and all other shifts that could be worked on the same day and the subsequent two days are shown. If you are already working the 'Same Day' shift, the shift name is highlighted, displayed as Scheduled by default in the 'Same Day' column. The Scheduled shift is the shift that you assume has already been scheduled and for which you are entering relationships.
The column is broken into two sub columns, the left sub column is labeled as 'Same Day', and lists all of your defined shifts. The right sub column is captioned 'One Day Later' and lists the preference for working each shift the same day as the Scheduled shifts. In a similar fashion, the 3rd column gives preferences for working each of the shifts used by your schedule 'Two Days Later' after working the Scheduled shift. Please note that the shift relations shown on the 'Same Day', 'One Day Later', and 'Two Days Later' columns relates only to the selected Scheduled shift. The entries in the columns do not affect each other in any way.
The displayed relationships are both labeled and color coded (red for 'Conflict', light blue for 'Okay', green for 'Prefer', yellow for 'High Dislike', and 'Dislike'). By default, all shift relationships are set to Conflict for shifts the same day as the Scheduled shift. Shifts starting 'One Day Later' but within 12 hours of the ending time of the Scheduled shift are also initially set to Conflict. An Okay preference is initially set for all other shifts. You can change these default values as desired.
Most entries you make on this screen will be in the 'One Day Later' column. The on the 'Same Day' column is useful if you have a provider who prefers (or is at least willing) to work two shifts back to back in a day. You will probably use the 'Two Days Later' column only to ensure that, if desired, a provider is guaranteed two days off following a night shift. Fifteen separate shift relation models can be created, allowing shift sequences to be individualized by provider or by providers with similar scheduling preferences. Initially it creates a single model assigned the name STANDARD.
1.Name: Enter in a 'Shift Relation Model Name' for the new 'Shift Relation Model'.
2. Shift: The 'Shift' name will be visible within the drop down menu. Both the shift full name and the shift short name are shown when defining shift relations. If you need to change shifts, you can select the next shift name from the drop down menu.
Note: When first entering shift relationships, start with the first shift and advance one by one through your customized shifts until reaching the bottom of the list. Doing this will help you avoid inadvertently skipping shift relations entry for any of your shifts. Later, if you need to go back and check or change entries, you can randomly change the sequence rather than advancing sequentially through them.
3. Copy Relations: Click on the 'Copy Relations' button next to 'Shift' name. Here you can copy the settings from one shift to the Scheduled shift. You have the option to pick the shifts from the drop down menu for the 'Copy from' and the 'Copy to' will be the default 'Scheduled' shift will be the default 'Scheduled' shift which grayed out.
4. Same Day: The shift name is highlighted, displayed as Scheduled by default in the 'Same Day' column. The Scheduled shift is the shift that you assume has already been scheduled and for which you are entering relationships. The preferences for working each of the shifts used by your schedule on the 'Same Day' as the 'Worked Shift'. You can change these default values as desired.
5. One Day Later: Most entries you make on this screen will be in the 'One Day Later' column. The shift name is highlighted, displayed as Scheduled by default in the 'One Day Later'.The Scheduled shift is the shift that you assume has already been scheduled and for which you are entering relationships. The preferences for working each of the shifts used by your schedule on the 'One Day Later' as the 'Worked Shift'. You can change these default values as desired.
6. Two Days Later: The shift name is highlighted, displayed as Scheduled by default in the 'Two Days Later' column.The Scheduled shift is the shift that you assume has already been scheduled and for which you are entering relationships. The preferences for working each of the shifts used by your schedule for 'Two Days Later' as the 'Worked Shift'. You can change these default values as desired.
7.Change a shift relation entry: Classify the desirability of working shifts surrounding your current 'Scheduled' shift as a Prefer shift relation, an Okay shift relation, a Dislike shift relation, a High Dislike shift relation, or a Conflict shift relation.
Example: Select your Night shift as the current Scheduled shift. Click on your Day shift in the 'One Day Later' column to highlight it. You can select the preference from the drop down menu by selecting it. (You can also use the keyboard key combination of 'Alt + Down Arrow' to open the list, press and hold down the 'Alt key', then press the 'Down Arrow key'.) Of the choices in the list (Okay, Prefer, Conflict, Dislike, High Dislike) select Conflict, since working the Day shift 'One Day Later' clearly conflicts with having just worked the Night shift.
Example: A 24 hour 7a-7a shift is the current Scheduled shift. Your providers require at least one day off after working the shift, but preferably two. For each shift in the One Day Later column, click the shift then select a Conflict shift relation. Select a Dislike relation for all shifts in the Two Days Later column.
Example: Your schedule uses Day, Swing, and Night shifts each day. Some of your providers want to work several of one type of shift in a row, then get two days off before starting a new type of shift. If the Day shift is the current 'Scheduled' shift you should set all shifts in both the 'One Day Later' and the 'Two Days Later' columns to Conflict except for the Day shift, which you would set to Prefer. Remember that you can create up to fifteen different shift relation sets. When you tell the Scheduler about your providers, you will designate a relationship model for each, allowing you to individualize shift relations to meet differing preferences between providers.
Edit Relation: After you have entered a 'Shift Relations Model Name', you can later change the model name or shift preferences if desired. Your 'Shift Relations Model Name' will have a check mark next to the name and the 'Edit Relation' option will display with the menu. For example, you could change the name of the model to the name of the provider it was created for, making it easier to identify when you assign relation models to your providers.