Identifying any holidays you want labeled and summarized in your schedule is an optional part of preparing for scheduling. You may want to create 'Categories' for holiday shifts worked by your providers or you may simply want the holidays labeled on your schedules. 'Holidays' can be entered for each schedule using the 'Designate Holiday' screen, but standard holidays can be automatically inserted into your schedule using the 'Holidays' feature from the 'Scheduler' tab.
The 'Holidays' contains three sections:
Automatically add to your schedules moving forward.
Using the options in the top menu of the Holidays screen, you can edit the holiday definitions (name and shifts), create new holidays or delete existing holidays.
The Holidays screen lists all shifts defined for your schedule.
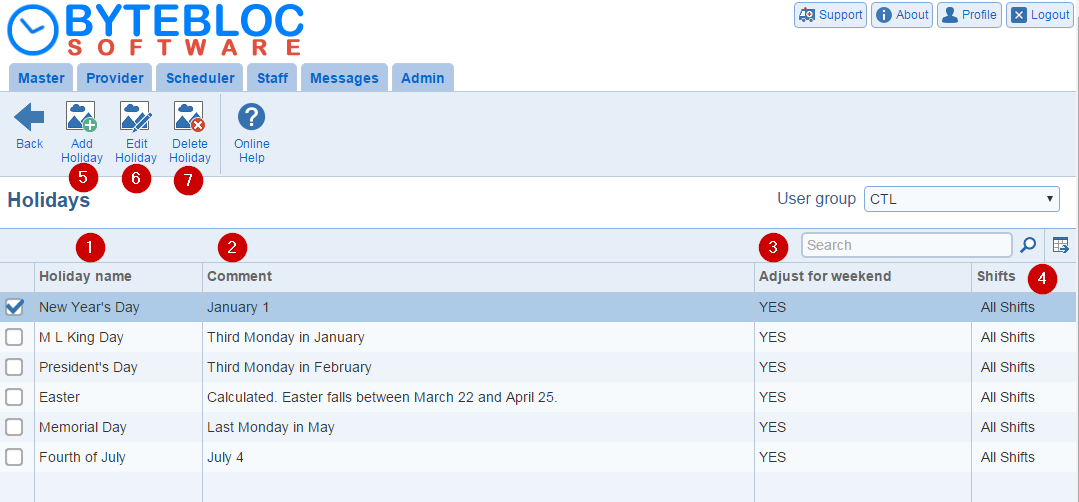
1. Holiday name: The holiday you create will be available in the Holidays listing. To select a holiday, simply select the check box from the 'Holiday name' column to make any changes such as editing or deleting the holiday from the menu.
2. Comment: The default 'Comment' is a brief note about the holiday, shown only on the 'Holidays' screen. This is used by the Scheduler to indicate the 'US' or 'Can' designation of several of the predefined holidays (such as Memorial Day and Victory Day) that have different names but have an identical date in different countries. Comments are used only in the 'Holidays' screen and are not printed on the schedules.
- Example: Click on the preset holiday New Year's Day, the 'Comment' will display January 1.
- Example: Click on the preset holiday Thanksgiving Day (US), the 'Comment' will display Fourth Thursday.
3. Adjust for weekend: If fixed date holidays fall on a Saturday or Sunday, the day they are celebrated may be changed to the nearest weekday instead, with a Saturday holiday celebrated on Friday and a Sunday holiday celebrated on Monday. If this is the case for a holiday you are entering, check the 'Adjust for weekend' check box. A 'NO' or 'YES' will be listed in the 'Adjust for weekend' column.
4. Shift type: Lists the names of the 'shifts defined' for your schedule. Each shift name has an adjacent radio button indicating whether it has been selected for inclusion as a holiday shift in the current holiday. To select 'All shifts', 'No shifts', or 'Subset shifts', simply click on the radio button adjacent to the shift name. The default selection is 'All shifts'.
5. Add Holiday: If you wish to add a new holiday or multiple holidays click the 'Add Holiday' button to create a new holiday definition. Select your 'Holiday' from the drop down menu. Type the name of the holiday in the 'Display name' text area.This is how the 'Holiday name' will appear in the schedule. The default 'Comment 'is a brief note about the holiday. Select the 'Shift type' that should be counted as holiday shifts in the newly created schedule. To select 'All shifts', 'No shifts', or 'Subset shifts', simply click on the radio button adjacent to the shift name. The default selection is 'All shifts'.
6. Edit Holiday: To change the name of an existing holiday or shifts, click on the check box of a holiday and select the 'Edit Holiday' button. A Holiday window appears containing the current information. Edit the name for the holiday, up to fifteen characters in length, then you can update the 'Holiday' shifts.
7. Delete Holiday: If you created a holiday and you decide to delete, or if you want to remove unused holidays to decrease the clutter in the Holidays listing. To delete a 'Holiday' select the check box listed next to the 'Holiday name' and click the 'Delete Holiday' button from the menu. The holiday will be automatically removed.
8. Holiday Format:Specify how holidays are displayed in schedules.