Here you can enter in your time off due to vacations or other obligations. This information is entered using the 'Shift Requests' feature. You'll need to retrieve a schedule request from the 'Provider' tab. Select the 'Shift Requests' button from the menu. Then, click on the drop down menu to switch locations if you work at multiple facilities.
Your requests will be displayed in the schedule. You have the ability to choose shifts to work, too. Click on the menu next to the number of the day. The menu will display the following options 'Times off', 'Need off', 'Wish off', 'Request on', and 'Available' for you.
*Please note that 'Need off' shifts are different from 'Can't Do Shifts'. Off Shifts are specific shifts in the current schedule for which you're are not available to work due to other obligations. 'Can't Do Shifts' are named shifts, such as Clinic shifts, that the provider cannot be scheduled for at any time in the schedule.
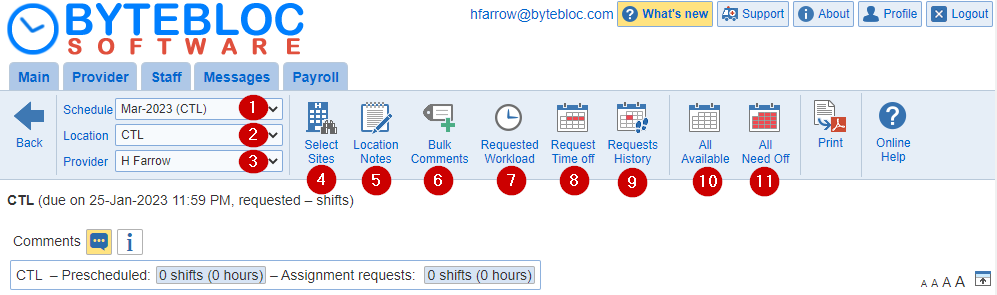
1. Schedule: To view a different schedule request, simply select the schedule from the drop down menu. You can move alphabetically through the Schedules by pressing the Down arrow key on your keyboard.
2. Location: To view different Locations, simply select the 'Location' from the drop down menu. You can move alphabetically through the Locations by pressing the Down arrow key on your keyboard. This drop down menu is only available if you work at multiple locations. The 'All locations' option views both requests at the same time. If you work at multiple locations within a group, 'All locations' will be default.
3. Provider: Your name will be displayed within the menu.
4. Select Sites: (Optional) This enables you to select which 'Sites' are being displayed in the current schedule. Initially displays all Sites. For large schedules that require scrolling in order to view the entire schedule, you can facilitate review and editing of specific Site schedules by limiting the display only to selected site(s). You can also, use the 'Need off' option, select the menu in the top corner next to the 'Site' name.

5. Location Notes: Select the 'Location Notes' button within the 'Shift Requests' screen. A pop up window will display called, 'Location notes'. These notes can be used for reminders specific to that schedule, such as 'studying for boards on the 15th, please cluster shifts in last half of month if possible', or 'please give both Howard and me a Saturday morning off to play tennis', or 'can take 1 - 2 extra shifts this month if needed'. To edit the Location Notes, click on the button and you'll be able to edit the notes in the window.
Note: 'Location notes' are available as read-only text from the shift requests screen after the due date has past for the requests.
6. Bulk comments: Manage provider comments in bulk for the current schedule.
7. Requested Workload: Here you can enter in the number of hours or the number of shifts you are requesting for the period.
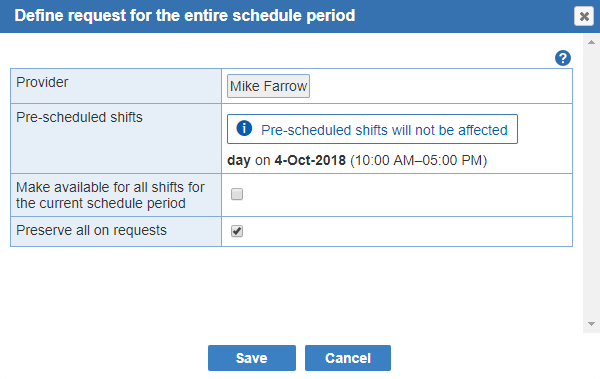
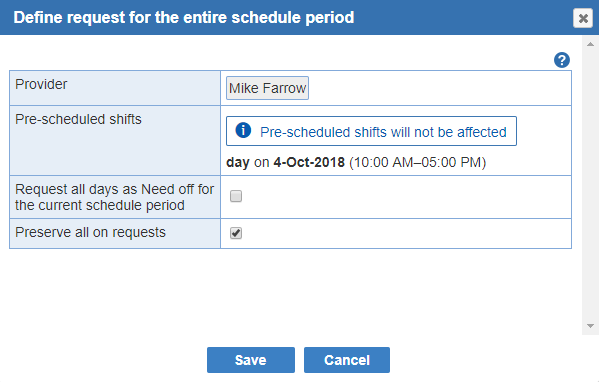
8. Request Times off: If you need to request several days off in a row, you can mark off by selecting the 'Request Time off' button in the top menu. Select the 'Times off' option and the 'Request time off' window will display. Here you have the option to choose from 'Need off' or 'Wish off' for your request.
Then, you'll be able to select a 'Starts' and 'Ends' time for the days you end up taking off. Next, click the 'Applicable locations' option for which the time off applies to. You also, have the option to make this a recurring event by choosing the 'Recur' feature.
Therefore, select the days of the week (Sun, Mon, Tue, Wed, Thu, Fri, and Sat) on which your time off occurs on by selecting 'Occurs on days'. The trash can icon displays after making your requests for the day. Select the icon to 'Delete' your requests if you found out you're available for that day.
Note: To set a range of dates off using the key combination, click the 'Need off' or 'Wish off' option from the menu, then click the Shift key or Alt key plus, the 'Need off' or 'Wish off' option from the menu on the last date. This will mark several days off.
9. Requests History: Here's a log of all changes for your requests. Hover over the highlighted shift and right click on the pop up to display the status.
10. All Available: Click this button to clear all Off Shift entries that you have made, making yourself available for scheduling for all shifts in the schedule except those that are 'Can't Do', 'Prohibit Biased' and 'Preserve all on requests'. This feature is useful if you have made errors entering off data (such as data for the wrong provider) and want to start over again. (Or if you used the 'All Need off' option.)
11. All Need off: Click this button to mark off for all shifts in the schedule, making yourself unavailable for scheduling purposes. Consider using this feature if you requested on for shifts and need to mark the rest of the days as off using the 'Preserve all on requests' option.
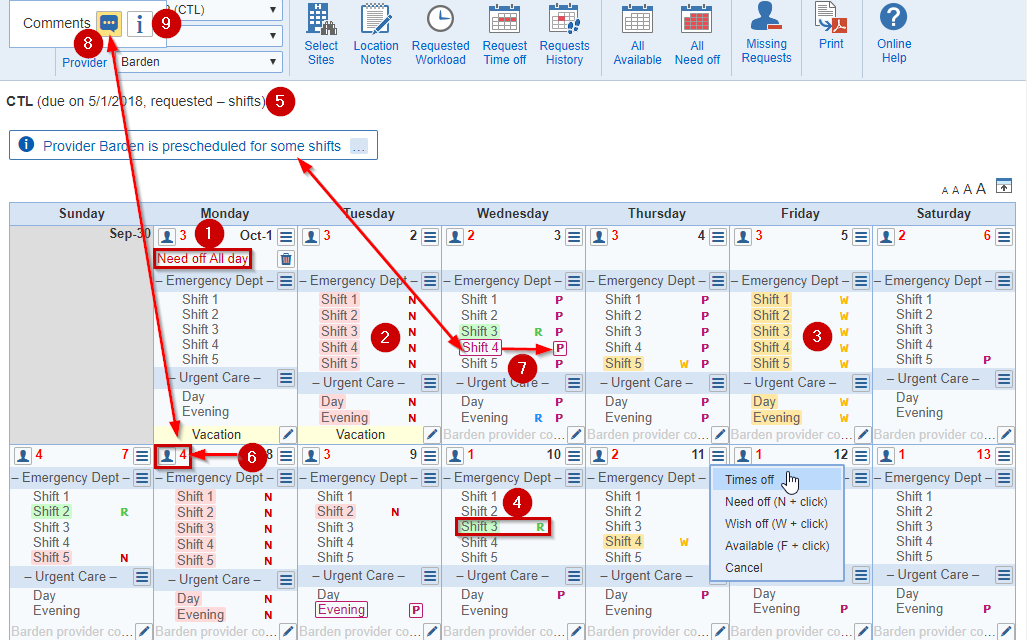
You can set the status of an individual day or shift by clicking on the shift then selecting an option from the menu, as:
1. Times off: You can mark off by selecting the 'Times off' option within the menu located in the top right corner of any day. Select the 'Times off' option and the 'Request time off' window will display. Here you have the option to choose from 'Need off' or 'Wish off' for your request.
Then, you'll be able to select a 'Starts' and 'Ends' time for the days you end up taking off. Next, click the 'Applicable locations' option for which the time off applies to. You also, have the option to make this a recurring event by choosing the 'Recur' feature.
Therefore, select the days of the week (Sun, Mon, Tue, Wed, Thu, Fri, and Sat) on which your time off occurs on by selecting 'Occurs on days'. The trash can icon displays after making your requests for the day. Select the icon to 'Delete' your requests if you found out you're available for that day.
Note: To set a range of dates off using the key combination, click the 'Need off' or 'Wish off' option from the menu, then click the Shift key or the Alt key plus, the 'Need off' or 'Wish off' option from the menu on the last date. This will mark several days off.
2. Need off: You are unable to work this shift. You can by pass the menu options and directly make this entry by selecting the letter 'N + click' on the shift. The letter 'N' highlighted in a pink background will be displayed and the font color for the shift name is pink. There's a 3rd option to make the entire site 'Need off' by clicking on the menu in the top right corner of the site.
Note: 'W(N)' is now shown when your 'Need off' request is converted to 'Wish off' due to the schedule administrator limit of how many 'Need off' requests per day
3. Wish off: You do not want to work this shift, but you're available if the shift cannot otherwise be scheduled. 'W + click' is the shortcut combination.The letter 'W' will be displayed and the shift name will be highlighted in yellow. A 'Wish off' shift will be scheduled for the provider who has requested it 'Wish off' only if the Scheduler cannot find any other way to schedule the shift.
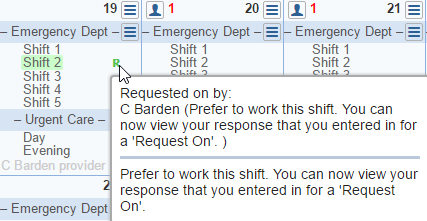
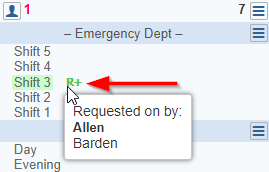
4. Request on: If you want to choose a shift you want to work, you can use the 'Request On' feature within the menu by left-clicking on the specific shift or select the letter 'R + click' on the particular shift. The letter 'R' highlighted in a green background will be displayed. The letter 'R' indicates a shift that has been requested for prescheduling by another provider. You can still also request prescheduling for the same shift and provide an explanation of your reasons. Your schedule administrator will ultimately make the decision about how the shift is scheduled.
Available: You wish to remove an existing Off or 'Request On' designation for a shift and return it to being simply 'Available' (available to work). 'F + click' is the shortcut key combination.
Note: Selecting the Available option will not affect shifts that your schedule administrator has designated for you as being 'Can't Do'.
5. Due Date: Listed at the top of the schedule with your requested hours or shifts.
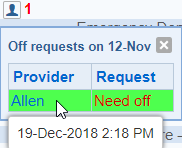
6. Show all off: The number adjacent to the icon on a day is the number of providers who have requested at least one shift off in that day. This information can help you to select days that your off request is most likely to be granted. If you have requested a shift off on a day, click on the icon to view the time priority of your request. You can also, click the icon to see a list of providers who have requested any shifts off in the day.
Shift off /Shift available: If you have requested a shift off within a day, simply click on the menu in the top right corner of any day. The pop menu will appear with 'Times Off', 'Need off', Wish off', and 'Available'. The day is automatically made as Off if you select 'Times Off', 'Need off', and 'Wish off' options.
If a shift is already marked as Off, the shifts can be made available, by selecting the 'Available' (F + click) option from the menu. 'Can't Do' and 'Prohibit Biased' are unaffected. This letter 'C' indicates a shift that your schedule administrator has marked for you as 'Can't Do'. You do not need to mark these shifts as Off in order to avoid being scheduled for them.
Note: To set a range of dates off using the key combination, click the 'Need off' or 'Wish off' option from the menu, then click the Shift key or the Alt key plus, the 'Need off' or 'Wish off' option from the menu on the last date. This will mark several days off.
Scheduler comment: Comments are displayed at the bottom of each day with a blue background. When a day in the schedule contains both provider and schedule administrator comments, only the administrator comment will be displayed with a blue background. You can see all comments for a day by hovering the mouse cursor over any existing comment. The comment will also be printed on the 'Main schedule'.
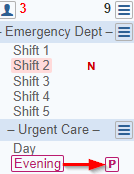
7. Prescheduled shift: If the administrator assigned shifts, in the request schedule the letter 'P' will be displayed and the shift name will be purple if you're assigned to the shift. There's another feature to hover over a shift and it will display 'Prescheduled to provider name'. The 'All available'/'All Need off'/'Request Times off' dialogs include a list of the shifts pre-scheduled to the provider.
- In the shift request screen, a message is shown above the calendar when the provider is prescheduled for some hours/shifts. A list of the shifts can be obtained by mousing over the '...' fragment in the message. An itemized list of shifts prescheduled to the current provider is available in the all off/all available dialog and time off definition dialog.

- Shifts prescheduled to the provider are highlighted prominently.
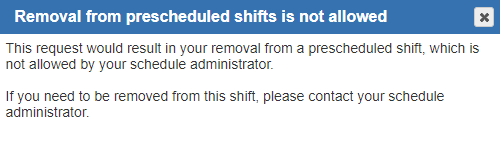
- You may receive this warning if you try and take yourself off of a prescheduled shift.
8. Provider comment: Comments are displayed at the bottom of each day. Provider comments are shown with a yellow background. If you have added multiple comments about a few days on your requests, you may want to add this information to the 'Location Notes'. This option is located within the 'Provider' tab > 'Shift Requests' screen.
You provider comments are displayed when you are viewing the individual, main, and request schedules as a reminder of why the day was requested off. You can see all comments for a day by hovering the mouse cursor over any existing comment. The comment will also be printed on your 'individual and main schedule'.
To add a provider comment: Enter a comment that you wish to have printed at the bottom of this day on your personal schedule.
- Click the 'Toggle editing of provider comments' icon or 'CTRL + 2'
- Left click on the provider comment pencil icon at the bottom of the day to add a comment. A provider comment window appears containing a text entry area. Type in the entry for the comment.
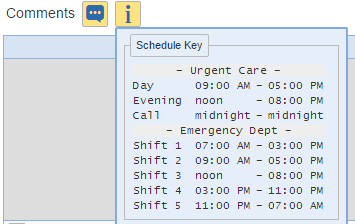
9. Schedule key: If a schedule key is defined by the schedule administrator, then the schedule key is available from a tool above the calendar.
Optional: If required by your schedule administrator, you can make your 'Need off' or 'Wish off' requests for the day more specific by holding down the appropriate letter key before clicking the date; 'A' for admin, 'C' for CME, 'X 'for personal, 'V 'for vacation. Right click to use combination with the letter to make the day 'Wish off'.
As suggested by your schedule administrator, you can make your 'Need off' or 'Wish off' requests more specific by selecting any of these four reasons - 'Admin' (administrative duties), 'CME', 'Personal' or 'Vacation'. Which explain why you are taking a shift off. You can by pass the menu and make these entries by clicking on the shift using the shortcut key combinations below.
Need off - Vacation (V + click) Need off - Admin (A + click) Need off - CME (C + click) Need off - Personal (X + click) Wish off - Vacation (V + right click) Wish off - Admin (A + right click) Wish off - CME (C + right click) Wish off - Personal (X + right click)
Optional: Request converted to 'Wish off' per your schedule administrator shift requests limit per day

