
New Version: Creation a 'New Version' of the schedule based on the current version.
Version Info: Edit the description, title and purpose for the current version of the schedule.
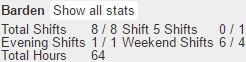
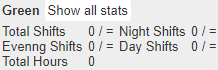
Summary: Generate 'summary' statistics of shifts and hours for providers for the current version of the schedule.
Note: The maximum number of shifts in a row and categories in a row are available in the right most two columns in the summary for a schedule version.
Shifts: Export scheduled shifts in tabular format.
Hours: Generates a summary of worked and scheduled shifts for the current revision.
Change Log: A 'Change Log' for shift and assignment changes is available for this version of the schedule.
Manage providers: Add or remove providers from this version.
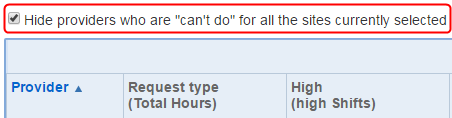
Provider settings: Edit the hours and shift request, shift sequences, and shift preferences for providers for this version. Short term provider information only applies to current version. Providers who are marked as 'Can't do' for all sites currently selected can be shown in the provider settings screen from the schedule revision screen.
Note:
- You can set the workload (total shifts or total hours) in the provider settings screen without clearing the requested workload from the providers in the 'Shift Requests'.
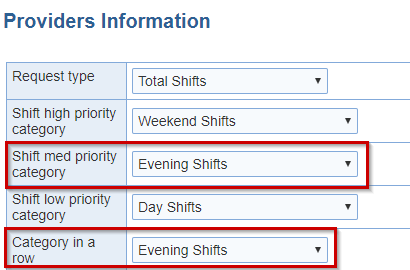
- Some settings are common to all revisions for all schedules: Shifts in a row, Caty in a row, (Evening Shifts), Link Sat-Sun and Relation model.
General drag and drop functionality: Drag and drop is available in revision screen to assign or unassign shifts.
Note: The Provider Settings screen layout omits the scroll bar in the provider table when viewed in a low resolution display.
Shift times: Modify the start and end times for a shift in this version of the schedule.
Lock / Assign: 'Lock, unlock, assign, or un-assign' all shifts in bulk
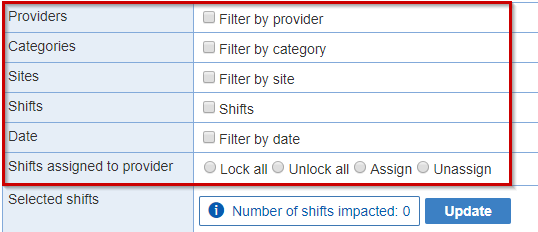
In schedule versions, shifts can be locked, unlocked assigned, and unscheduled by any combination of providers, categories, sites, shifts, and date.
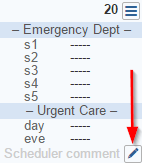
Provider comments: Show the comments entered by the providers.
Bulk comments: Manage scheduler comments in bulk in the revision screen for the current schedule.
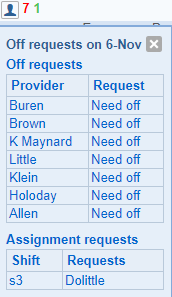
Review requests: Manage shift assignment and workload requests made by providers
Manage holidays:Manage the holidays for the current schedule
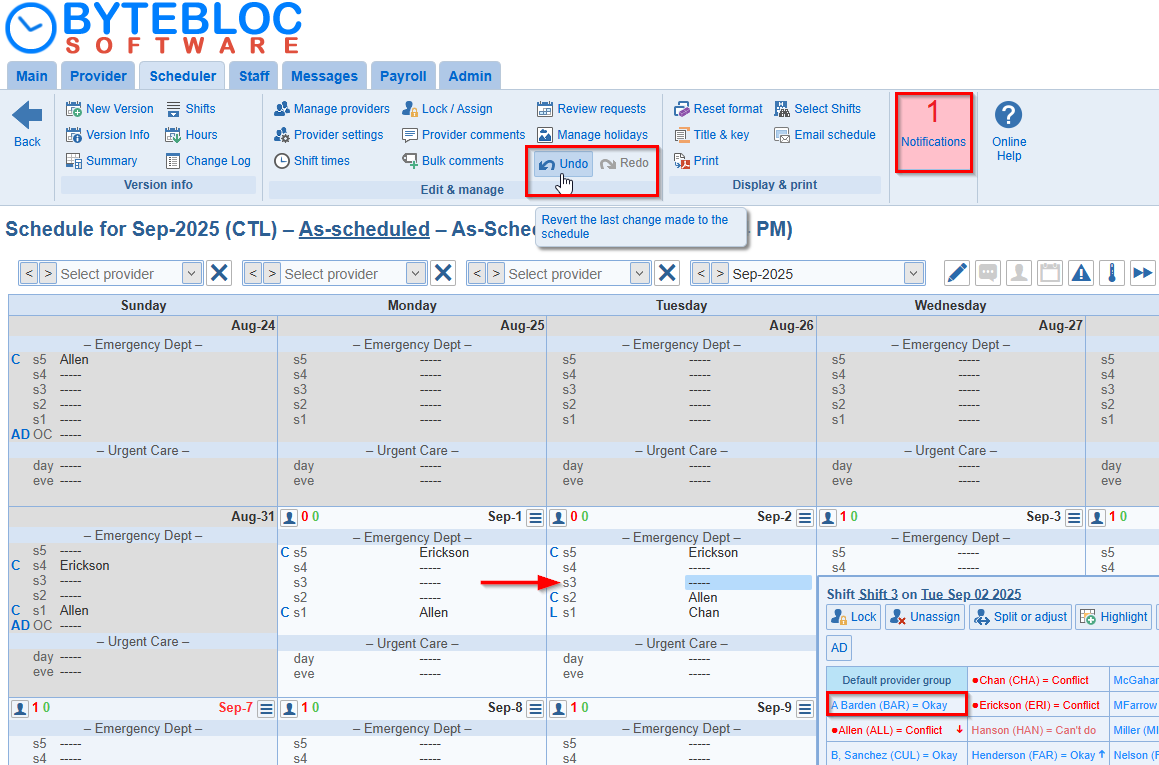
Undo & Redo: 'Undo' and 'Redo' are available in the revision screen for the assignments of shifts to providers. 'CTRL + Z' is the same as clicking 'Undo' and 'CTRL + Y' is the same as clicking 'Redo'. Automation, clearing the schedule, or changing the shifts in the schedule also resets the 'Undo' and 'Redo' functions.
Undo: Revert the last change made to the schedule
Redo: Reapplies the last undone schedule change
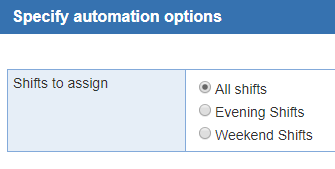
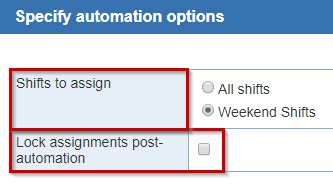
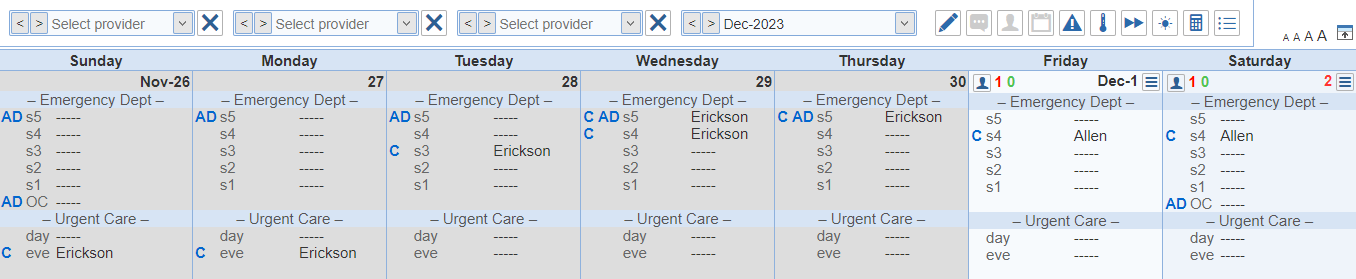
Automate: Create or revise the schedule using the automated schedule optimizer. As each shift is scheduled, the name of the newly scheduled provider replaces the blank line that had previously represented the unscheduled shift. Depending on the speed of your computer and the complexity of your schedule, the entire scheduling process requires anywhere from a few seconds to several minutes.
Clear: Clear computer assigned scheduled shifts and restart scheduling from scratch.
![]()
Provider Information screen
Specify automation options
Note:
Reset format: Resets the display or print format for this version to match the current print and display format for new schedules
Title & Key: Manage schedule title and key settings
Print: Prints the current page and include description
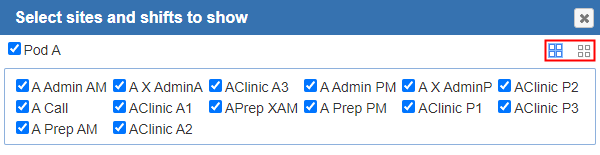
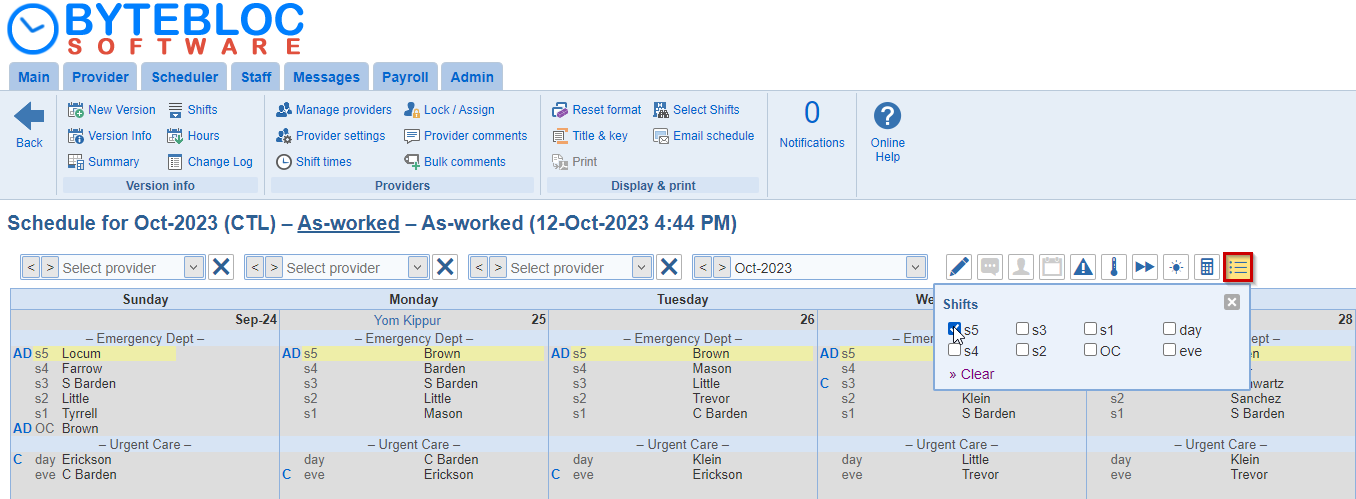
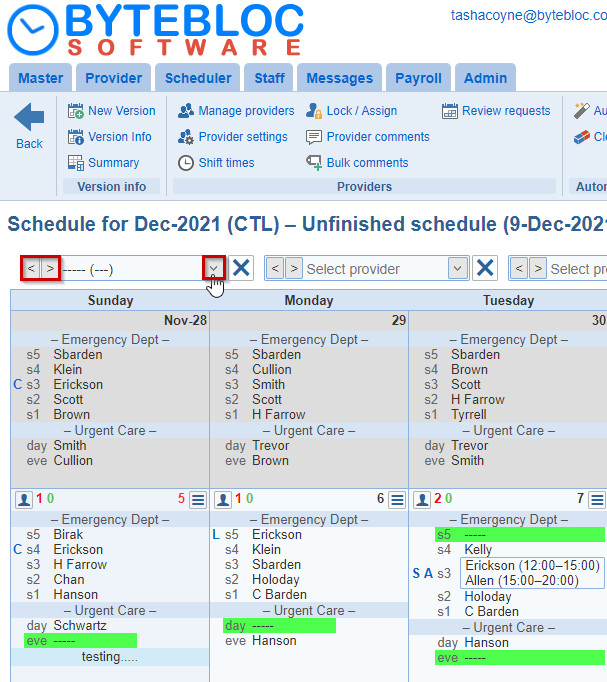
Select Shifts: Select the sites to display in the schedule. The selection of sites to show in the schedule is preserved while navigating to other pages from the revision edit screen. Upon return to the revision screen, the sites shown will be as selected previously.
Email Schedule: Send a PDF of the current schedule to providers by email.
Notifications: See current notifications for schedule changes. It keeps track of all the changes you made to the current version. The number will increase upward if there's any notifications. You have the option to dismiss these notifications by selecting 'X' or 'Clear'.
Minimum number of days adjacent to the start and end for the current period to show in the revision screen is now available within the revision screen. The option applies to days both before and after the end of the schedule.
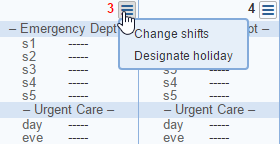
Change shifts: You have the option to add/remove 'Day types', 'Individual shifts' or 'Shift substitutions' from a range of days in the schedule version.
Designate holiday: If you forget to add a holiday, you can use the 'Designate holiday' option.
CTRL+n (n: 1 through 0): toggle for the tools available immediately above the calendar

1. Location menu: Location administrators at more than one location can switch between locations from within the schedule revision screen.
2. Toggle editing of scheduler comments (CTRL + 1): Enter a comment that you wish to make available to everyone with access to the schedule. The 'Toggle editing of scheduler comments' icon will display at the bottom of each day.
3. Toggle editing of provider comments (CTRL + 2): Enter a comment that you wish to have printed at the bottom of this day on your personal schedule.
Note: The comment editing mode for either provider comments or scheduler comments can be toggled on or off in the schedule revision screen and the request screen.
4. Show the individual calendar for the provider currently selected (CTRL + 3): Facilitates the review of individual provider schedules by displaying only the shifts scheduled for the currently selected provider. This allows review at a glance of all scheduled shifts for an individual provider.
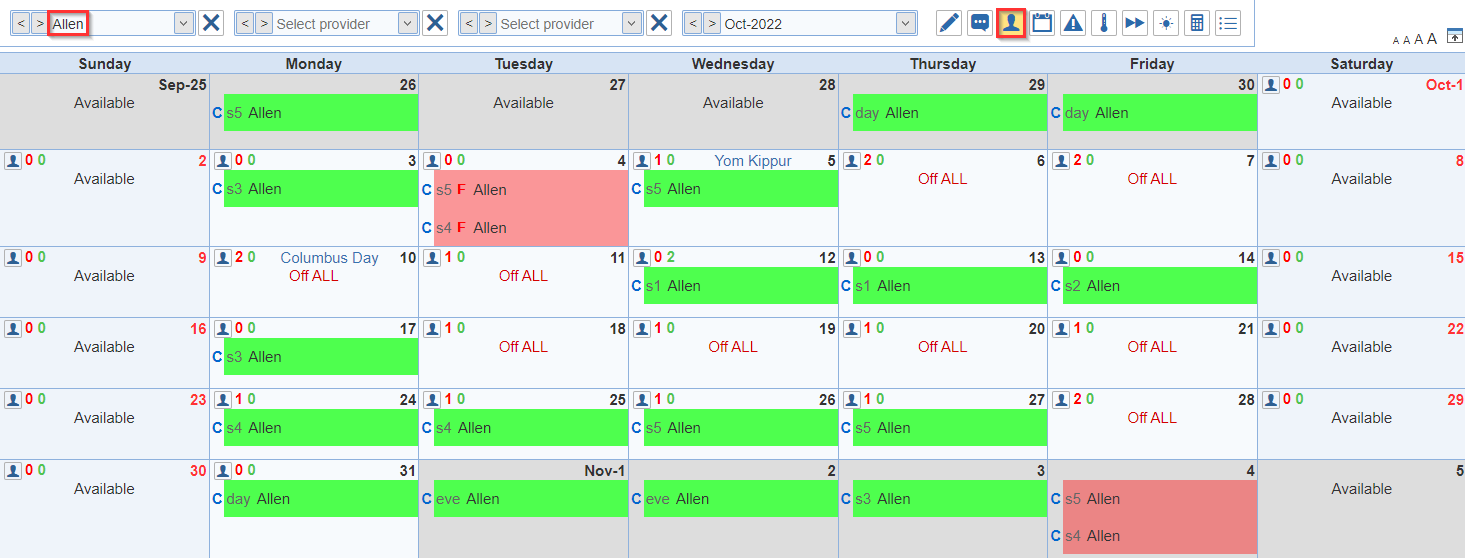
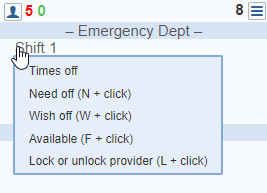
5. View and manage shift requests for providers (CTRL + 4):
Keyboard Shortcut: Select the 1st option (Need Off, Wish Off, or Available) for the start date and then click the Shift key + Need Off, Wish Off or Available on the end date to mark multiple days off for a provider.
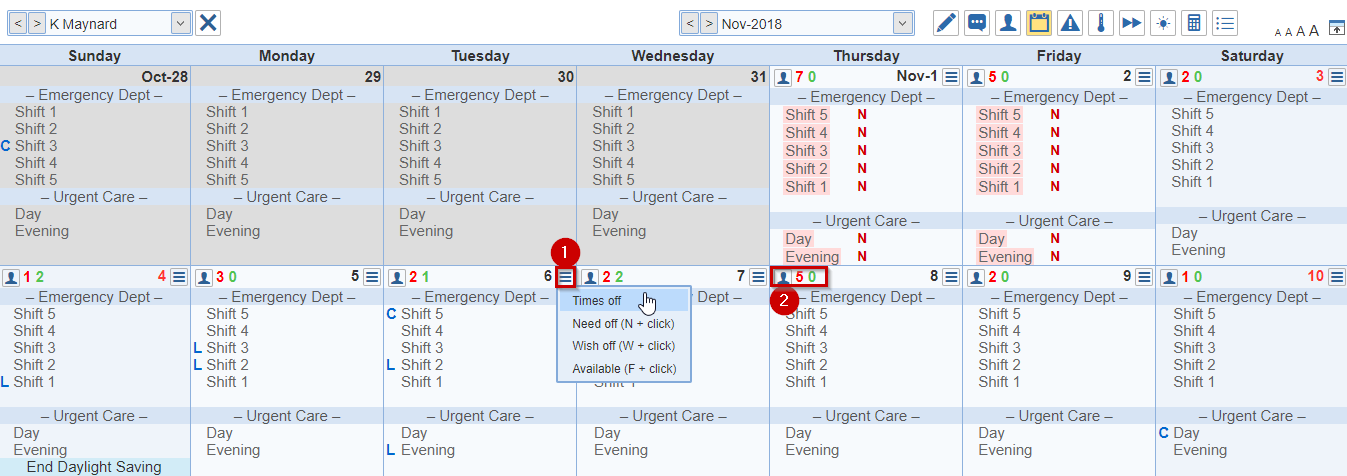
Here you have the option to choose from 'Need off' or 'Wish off' for their 'Request'.
Then, you'll be able to select a 'Starts' and 'Ends' time for the days you end up taking off. Next, click the 'Applicable locations' option for which the time off applies to. You also, have the option to make this a recurring event by choosing the 'Recur' feature.
Therefore, select the days of the week (Sun, Mon, Tue, Wed, Thu, Fri, and Sat) on which your time off occurs on by selecting 'Occurs on days'. The trash can icon displays after making your requests for the day. Select the icon to 'Delete' your requests if you found out your provider is available for that day.
- Note: Selecting the 'Available' option will not affect shifts that your schedule administrator has designated for you as being 'Can't Do'.
As suggested by you the schedule administrator, you can make your 'Need off' or 'Wish off' requests more specific by selecting any of these four reasons - Admin (administrative duties), CME, Personal or Vacation. Which explain why you are taking a shift off. You can by pass the menu and make these entries by clicking on the shift using the shortcut key combinations below.
| Need off - Vacation (V + click) |
| Need off - Admin (A + click) |
| Need off - CME (C + click) |
| Need off - Personal (X + click) |
| Wish off - Vacation (V + right click) |
| Wish off - Admin (A + right click) |
| Wish off - CME (C + right click) |
| Wish off - Personal (X + right click) |
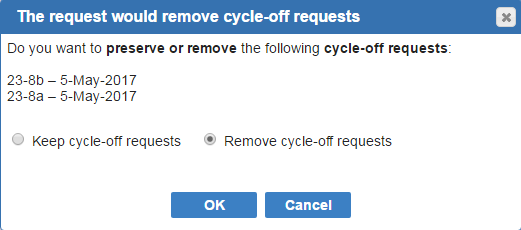
Administrators can either preserve or remove cycle off request when creating a new shift request that overlaps with cycle off requests.
Note: The TAB key allows to quickly switch between the assignment mode and the request mode in the schedule revision screen.
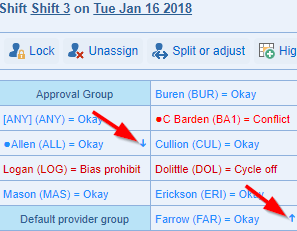
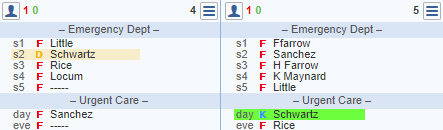
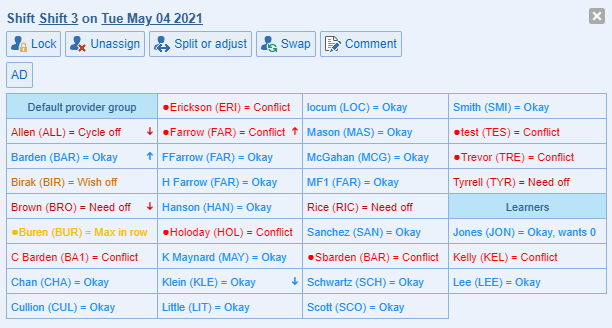
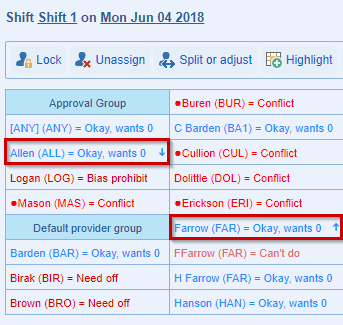
6. Highlight scheduling conflicts or clear highlighting of scheduling conflicts (CTRL + 5): Any shifts for which providers are scheduled that they 'Can't Do', they requested off, exceed the number of max in a row shifts, which conflict or clash with another shift that they work, or for which they have a 'Prohibit bias' are highlighted.
ByteBloc will not create scheduling conflicts during computerized scheduling, but you can manually schedule any provider for any shift or change a provider's requests, thus creating a conflict. In the revision screen, assignment conflicts are highlighted prominently when tool 'Highlight scheduling conflicts or clear highlighting of scheduling conflicts' is used. This can occur if you:
- Schedule a provider for a shift that they normally 'Can't Do'. ByteBloc will display a warning if you request this, but will allow the change if confirmed by you.
- Schedule a provider for an additional day in row that they normally don't work 'shift in a row' that did not previously exist for the scheduled shifts.
- Change a provider's availability, adding an off request for a shift that is already scheduled for a provider. ByteBloc will display a warning if you request this, but will allow the change and leave the scheduled shift if confirmed by you.
- Change a provider's shift relationship requests, creating a conflict shift relationship that did not previously exist between two scheduled shifts.
- Change a provider's shift preferences to create a 'Can't Do' preference that did not previously exist for a scheduled shift.
- Change a provider's bias settings to create a 'Prohibit bias' that did not previously exist for a scheduled shift.
![]()
Max in a row dependencies are included in the conflict view for schedule versions

All the dependency codes shown are on the version screen:
| Can't Do: C |
| Clash (scheduling at other location): L |
| Conflict: F (relation model) |
| Cycle off: Y |
| Dislike or high dislike: D |
| Prefer or high prefer: P |
| Max in a row: M |
| Need off: N |
| Okay: K |
| Prohibit: H (bias) |
| Wish off: W |
7. Highlight shifts based on likely easiness to schedule (CTRL + 6): A metric indicating the likely easiness with which shifts can be assigned is available from the 'hot spots' tool in the schedule revision screen. The metric is shown for each shift with the following codes:

- red 'H': hardest to assign
- orange 'h': hard to assign
- blue 'e': easy to assign
- green 'E': easiest to assign
Note: The ease of scheduling is based on 'hard' constraints only (can't do, clash, conflict, cycle off, need off, prohibit). 'Soft' constraints such as wish off are not considered.
8. Show provider speed (Ctrl +7): You can show shift assignment in the context of provider speed by using a tool or pressing CTRL+7. In this view, fast providers are identified with an arrow pointing upward and slow provider with an arrow pointing downward.

Note: Co-assignment of shifts for shift starting within 3 hrs of each other are highlighted in yellow when the providers assigned are both fast and in red when the providers are both slow.
9. Highlight assignments when hovering over a provider name (CTRL + 8): In the schedule revision screen, when the tool is active, assignments are highlighted through an orange marker to the left of the shifts when the mouse hovers over a provider name, either in the main calendar or the shift detail popup. The tool can be activated or inactivated using key combination 'CTRL+8'.
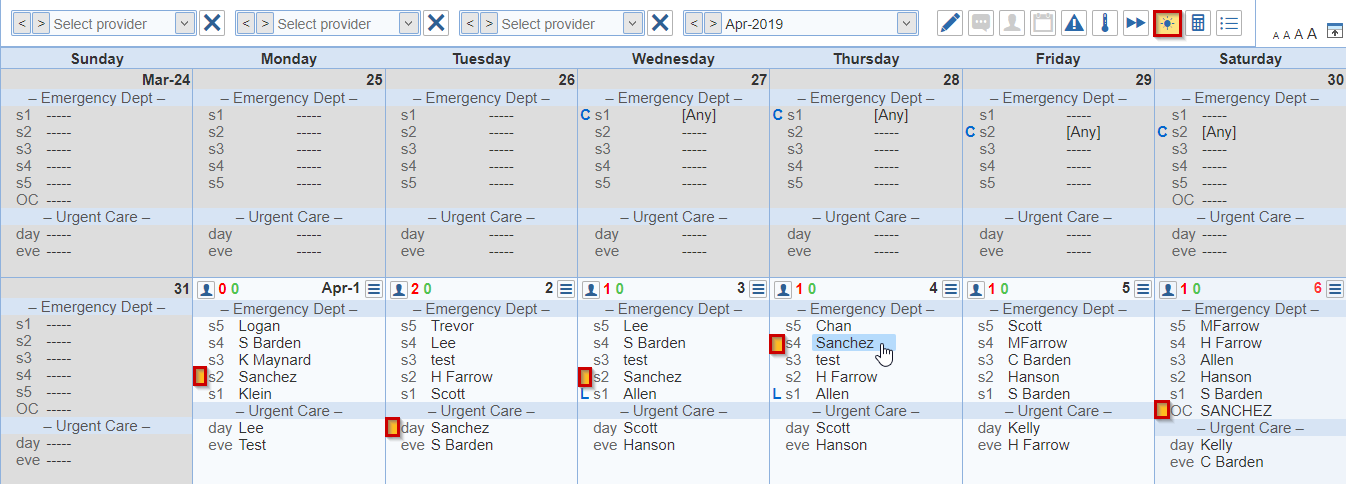
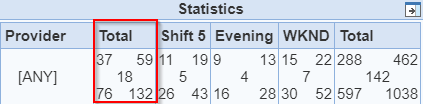
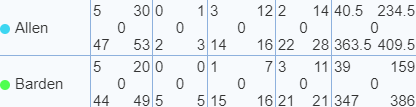
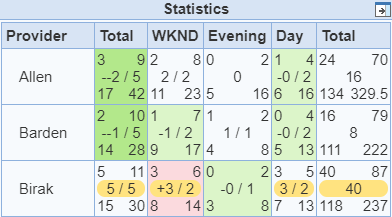
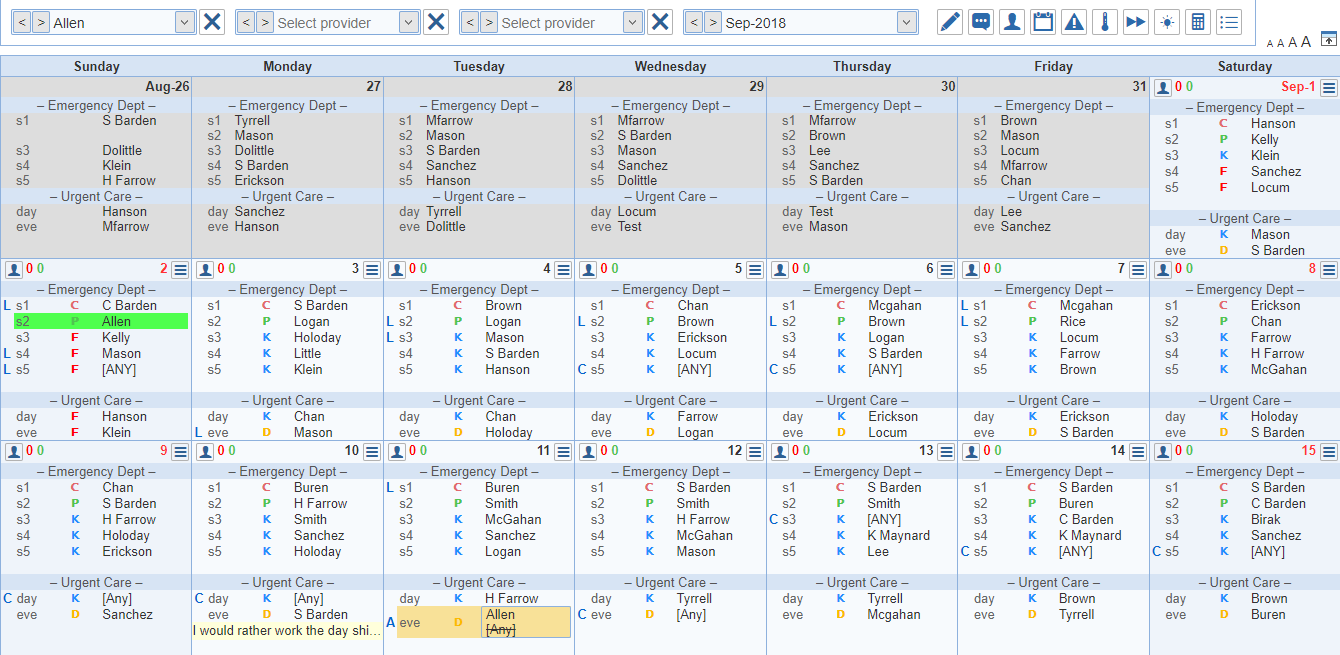
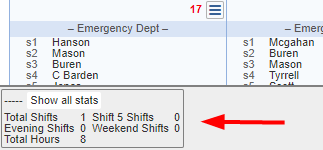
10. Show provider statistics (CTRL + 9): The statistics for the current revision (based on the shift assignments for the revision). By default the provider statistics table opens on the left side of the revision screen. You can click on the 'Calculator' icon or the keyboard shortcut 'CTRL + 9' to disable this function. If you turn it off, the next time you open a schedule it will be hidden.

It can moved to either side of the screen by using the  (Move to the right side) or
  (Move to the left side) icons. If you scroll down the table will follow.
This feature shows the stats of the providers while working on the schedule at the same time instead of opening the 'Summary' screen. Also, if you open a different screen such as the Provider Settings the provider stats table will take a while to load.
The statistics for the 'best revision' for schedules included in the various time periods (3, 6, 9, and 12 months). The best revision for a schedule corresponds to either the adjusted final, as-worked, as-scheduled, or draft revision, picked in this order, based on the availability of the revisions.
This data shows 3 months on the top left, 6 months on the top right, in the middle is the current schedule, 9 months on the bottom left, and 12 months on the bottom right within each column row for the providers. Also, the order of the columns are based on the order within the 'Categories' screen from the 'Scheduler' portal.
If you select a provider from the provider selector, it displays color dots next to the provider's name and the change shows as highlighted.
Selecting providers from the statistics table
The menu to select the provider is available when right clicking in the provider cell.
Alternatively, a double click on the cell selects the provider in the first selector as does pressing '1' with the mouse hovering anywhere within the row in the table for a provider.
If 'shift' is pressed when double clicking, the provider is selected in the second selector. Pressing '2' with the mouse hovering anywhere within the row in the table for a provider also selects the provider in the second selector.

Note:
0. Show statistics for selected shifts (CTRL + 0): Highlight shifts in a row. You can click on the bullet point icon, '>> Clear' or 'CTRL + 0' to disable this function.
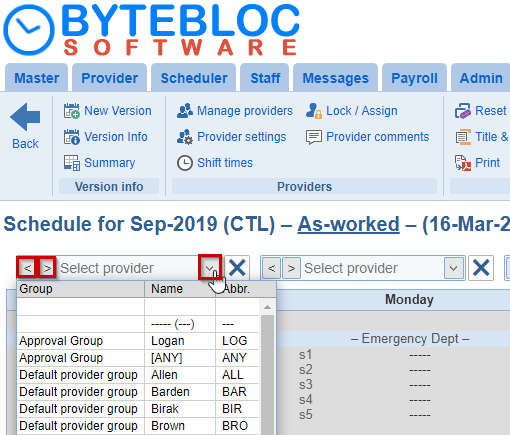
Select provider print names from the menu to view individual providers schedules. You can type in the 3 letter abbreviation in the first provider selector, use the back and forward arrows plus, use Up and Down arrow keys on the keyboard to scroll for a provider within the revision screen. Up to 30 providers can now be seen without scrolling in the provider selectors.
Unassigned shifts can be highlighted using the provider selector in the schedule revision screen by selecting ---- as the first provider. The abbreviation is (---).
SHIFT + 3 letter abbreviation: selects the provider with that abbreviation in the second provider selector
L while clicking on provider name in provider selector: creates a locked assignment for a scheduled shift
The providers selectors in the schedule revision screen lists the providers by provider group.
When a provider is selected in the schedule version screen, the highlighting of the shifts assigned to the provider takes into account the dependency for the shift and the provider.
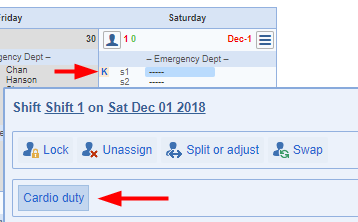
- Lock: Lock the provider to the shift. Pressing the 'L' key while selecting the provider also works to lock.
- Unlock: Shift assignments that are locked can be unlocked from the shift provider detail popup.
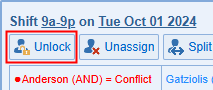
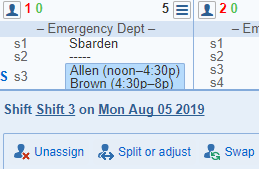
- Unassign: 'Unassign' provider from shift and make temporarily off for the day.
- Split or adjust: 'Split' shifts between several providers or 'adjust' the hours worked for the shift.
- Highlight: In the revision edit screen, highlighting is done through the provider popup (from the shift). 'Highlight' applies to 'As-scheduled' and 'As-worked' revisions only.
- Swap: The assignments of providers to two distinct shifts can be exchanged by using the swap function. To start an assignment swap, click on shift and select the swap tool. Alternatively, click on the shift while pressing the 'SHIFT' key. The shift will be highlighted, indicating that a swap is in progress. To complete the swap, select the second shift and use the swap tool again. Clicking on the shift while pressing 'SHIFT + Click' is supported also.
SHIFT while clicking on a shift: starts an assignment swap; the swap is completed by clicking on a second shift and the providers assigned to the two shifts are swapped
- Note that the swap function can be used on unscheduled shifts.
- To cancel a swap in progress, press the 'ESC' key or use the swap tool on the assignment used to start the swap.
- Comment:In the revision edit screen, the 'Comment' can be edited using tool 'Comment' or 'Split or adjust' in the shift assignment menu.
- When the provider menu is open in the variant edit screen (after click on a shift assignment), a provider can be scheduled for the shift by typing their 3 letter abbreviation.
- Custom 'tags' can be defined and applied to shifts by selecting this option.
Note:
- CTRL (Windows) or ALT (MaxOS) while clicking on a provider in the shift popup: assigns the provider, selects the next shift for the day and keeps the shift popup open
- Typing the 3 letter abbreviation when the provider popup is open will assign the shift to the provider.
- Clicking on the shift should hide the popup now. The provider popup can be closed by pressing the 'Esc' key or clicking on the close ('x') icon. Additionally, the popup can be moved on the screen using drag and drop.
ESC key: closes any open popups and clears the provider selectors
- The 'Lock' tool in the shift assignment popup is not available when a shift is split. Locking is not meaningful for a split since the automation will not change the assignments for a split.
- The speed of the providers is also shown in the shift detail popup to the right of the dependency for each provider.
Tips:
- After computerized scheduling is complete, you may then review and 'Clear', modify and distribute your schedule as desired.
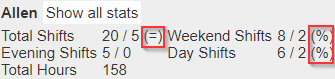
When the statistics are computed for a single provider, as is the case when a provider is selected in the schedule version screen, the target displayed did not reflect the correct number of shifts in the case when was set to either equal (=) or percent (%). Rather than displaying the target as a number of shifts or hours in this case, it is shown now as either = or %. The actual number of hours or shifts can be viewed in the 'Provider Information' or 'Summary' screens.
Note:
